falconzy's Blog

My Learning Path

angularJS Learning Resource

Angular setep by step learning website

recommend Blogs

Github Projects

Jquery

Javascript Library

Node modules

  • ursa – provides a fairly complete set of wrappers for the RSA public/private key crypto functionality of OpenSSL.
  • node-uuid – Generate RFC-compliant UUIDs in JavaScript
  • node-oauth2-provider – A simple customizable OAuth 2.0 provider (server) for node.js.
  • wechat-chrome-plugin – A WeChat(微信) plugin for chrome, add notification and some other stuff
  • koa – Koa is a new web framework designed by the team behind Express
  • node-pwd -Hash and compare passwords with the crypto’s pbkdf2.
  • ejs – Embedded JavaScript templates for node
  • node-webkit – app runtime based on Chromium and node.js. You can write native apps in HTML and Javascript with node-webkit.

Project boilerplate

Sample Project###

node-todo – A simple Node/MongoDB/Angular todo app twitter-mongo – Simple User Authentication with Node.js, Express, Mongoose, and Passport

Programming guide

angularjs-style-guide – Community-driven set of best practices for AngularJS CSS-Guidelines – High-level guidelines from writing manageable, maintainable CSS

ASP.NET MVC

ASP.NET MVC

Setup Grunt Project

Reference

Installation

Lets install the Grunt CLI globally so we can access the “grunt” command.

npm install grunt-cli -g

check and make sure Grunt is installed correctly

grunt --version

Note that installing grunt-cli does not install the Grunt task runner! The job of the Grunt CLI is simple: run the version of Grunt which has been installed next to a Gruntfile. This allows multiple versions of Grunt to be installed on the same machine simultaneously.

Project Integration

Integrate Grunt with our project. package.json

{
    "name": "my-project-name",
    "version": "0.1.0",
    "devDependencies": {
      "grunt": "~0.4.2",
      "grunt-contrib-jshint": "~0.6.3",
      "grunt-contrib-nodeunit": "~0.2.0",
      "grunt-contrib-uglify": "~0.2.2"
    }
}

A Gruntfile is a JavaScript file that Grunt leverages to understand your projects tasks and configuration. When you run “grunt” from the command line, Grunt will recurse upwards till it finds your Gruntfile. This functionality allows you to run Grunt from any sub directory of your project.

Gruntfile.js

A Gruntfile is comprised of the following parts:

  • The “wrapper” function
  • Project and task configuration
  • Loading Grunt plugins and tasks
  • Custom tasks

This is the basis of a Grunt file, it’s a wrapper function that takes in “grunt” as an argument. This allows us to register tasks and configuration with grunt (and leverage Grunt’s APIs) before Grunt actually runs any tasks

module.exports = function(grunt) {
     // set up grunt
};

Automate The Grunt Work

JSHint

npm install grunt-contrib-jshint --save-dev 
module.exports = function(grunt) {
      grunt.initConfig({
        jshint: {
          src: ['Gruntfile.js', 'src/app/**/*.js', 'src/config.js', 'tests/app/**/*.js'],
          options: {
            curly: true,
            eqeqeq: true,
            immed: true,
            latedef: true,
            newcap: true,
            noarg: true,
            sub: true,
            undef: true,
            boss: true,
            eqnull: true,
            browser: true,
            globals: {
              require: true,
              define: true,
              requirejs: true,
              describe: true,
              expect: true,
              it: true
            }
          }
        }
      });

      // Load JSHint task
      grunt.loadNpmTasks('grunt-contrib-jshint');

      // Default task.
      grunt.registerTask('default', 'jshint');
};

run grunt

$ grunt

Running "jshint:src" (jshint) task
Lint free.

Done, without errors.

OR :

$ grunt jshint 

Running "jshint:src" (jshint) task
Lint free.

Done, without errors.

grunt “watch” task

npm install grunt-contrib-watch --save-dev

grunt.initConfig({
    watch: {
        files: '<%= jshint.src %>',
        tasks: ['jshint']
    },  
});

grunt.loadNpmTasks('grunt-contrib-watch');

This tells the grunt “watch” task (a built in task), to run the “lint” task every time one of the configuration specified lint files changes

Test-Driven Development in Node.js With Mocha

Reference

package.json devDependancies

devDependencies: {
  "chai": "*",
  "mocha": "*" // our preference, but you can use any test runner you like
}

Mocha structure

  • describe() is used to group together similar tests in Mocha
  • It() describes a specific use-case for the method being tested.
  • done() callback – Testing asynchronous code
  • before(), after(), beforeEach(), afterEach() – hooks to setup the test case
  • Pending tests – without a callback

chai BDD styles

API Reference

var expect = chai.expect;
expect(foo).to.be.a('string');
expect(foo).to.equal('bar');
expect(foo).to.have.length(3);
expect(tea).to.have.property('flavors')
    .with.length(3);

Sublime Text 3 - Tips

Sublime Text 3 Reference

Add Shortcut to Mac

cd /
ln -s "/Applications/Sublime Text.app/Contents/SharedSupport/bin/subl" /bin/subl
subl [fileName] (for edit in sublime text)

Distraction Free Mode

Active by:

Control + Shift + Command + F

My Setting:

{
   "line_numbers": false,      
   "gutter": false,            
   "draw_centered": true,      
   "wrap_width": 80,           
   "word_wrap": true,          
   "scroll_past_end": true     
}   

Useful Keyboard Shortcuts —OSX

Shift + Command + P         //Access the Command Palette
Command + P                 //Fast File Switching
Command + R                 //Goto Symbols
Shift + Comand + T          //Open Rencent Closed File
Command + [ or ]            //indent
Ctrl + m                    //Jump between the {}
ctrl + shift + M            //Select of all section between {}
Command + /                 //Comment
Command + Option + /        //Comment block 
Command + L                 //Line selection
Option + Arrow_key          //word by word
Shift + Command + f         //Search for whole project
Commond + Option + f        //replace
Option + Command + [1,2,..] //layout window

Enable multi-selection, you have several options:

  • Press Alt or Command and then click in each region where you require a cursor.
  • Shift + Control + (Arrow_Key)
  • Command + d: Select the current word and the next same word
  • Select a block of lines, and then press Shift + Command + L
  • Add an additional cursor at all occurrences of a word by typing Ctrl+Command+G

Suggest Package

  • Alignment
  • Emmet
  • Colorpicker
  • SublimeCodeIntel

Getting Started Mongoose

installation

$ npm install mongoose

Connection

var mongoose = require('mongoose');
mongoose.connect('mongodb://localhost/tasks');
var db = mongoose.connection;

db.on('error', console.error.bind(console, 'connection error:'));
db.once('open', function callback () {
// conding here;
//Once connection opens,callback will be called here.
});

Disconnect

mongoose.disconnect();

REGISTERING A SCHEMA

With Mongoose, everything is derived from a Schema.

var Schema = mongoose.Schema;
var Tasks = new Schema({
        project: String,
        description: String
});

Next step is compiling our schema into a Model.

mongoose.model('Task', Tasks);

ADDING A TASK

var Task = mongoose.model('Task');
var task = new Task();
task.project = 'Bikeshed';
task.description = 'Paint the bikeshed red.';
task.save(function(err) {
    if (err) throw err;
    console.log('Task saved.');
});

SEARCHING FOR A DOCUMENT

var Task = mongoose.model('Task');
Task.find({'project': 'Bikeshed'}).each(function(err, task) {
    if (task != null) {
        console.log('ID:' + task._id);
        console.log(task.description);
        } 
});

UPDATING A DOCUMENT

var Task = mongoose.model('Task');
Task.update(
    {_id: '4e65b793d0cf5ca508000001'}, \\Update using internal ID
    {description: 'Paint the bikeshed green.'},
    {multi: false}, \\Only update one document
    function(err, rows_updated) {
        if (err) throw err;
        console.log('Updated.');
    }
);

REMOVING A DOCUMENT

var Task = mongoose.model('Task');
    Task.findById('4e65b3dce1592f7d08000001', function(err, task) {
    task.remove();
});

Extra

add methods to our documents:
methods must be added to the schema before compiling it with mongoose.model()

Tasks.methods.list = function () {
var greeting = this.name
    ? "Meow name is " + this.name
    : "I don't have a name"
    console.log(greeting);
}
var Kitten = mongoose.model('Kitten', kittySchema)

Functions added to the methods property of a schema get compiled into the Model prototype and exposed on each document instance:

var fluffy = new Kitten({ name: 'fluffy' });
fluffy.speak() // "Meow name is fluffy"

Each document can be saved to the database by calling its save method. The first argument to the callback will be an error if any occured.

fluffy.save(function (err, fluffy) {
    if (err) // TODO handle the error
    fluffy.speak();
});

We can access all of the documents through model.

Kitten.find(function (err, kittens) {
    if (err) // TODO handle err
    console.log(kittens)
})

filter by name, Mongoose supports MongoDBs rich querying syntax.

Kitten.find({ name: /^Fluff/ }, callback)

This performs a search for all documents with a name property that begins with “Fluff” and returns the results to the callback.
OAuth 2.0

Summaries on : OAuth 2.0 – The Good, The Bad & The Ugly http://net.tutsplus.com/tutorials/oauth-2-0-the-good-the-bad-the-ugly/

What is OAuth?

OAuth is an open standard for authorization. OAuth provides a method for clients to access server resources on behalf of a resource owner (such as a different client or an end-user). It also provides a process for end-users to authorize third-party access to their server resources without sharing their credentials (typically, a username and password pair), using user-agent redirections.

OAuth is a service that is complementary to, and therefore distinct from, OpenID. OAuth is also distinct from OATH, which is a reference architecture for authentication (i.e. not a standard).

Key Words of OAuth

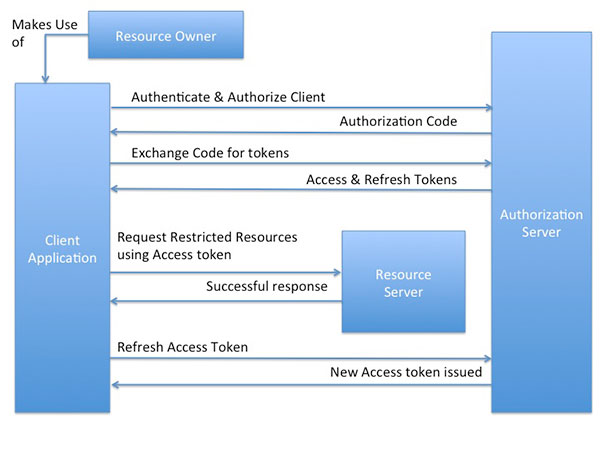
  • Resource Owner : An entity capable of granting access to a protected resource. Most of the time, it’s an end-user.
  • Client : An application making protected resource requests on behalf of the resource owner and with its authorization. It can be a server-based, mobile (native) or a desktop application.
  • Resource Server : The server hosting the protected resources, capable of accepting and responding to protected resource requests.
  • Authorization Server : The server issuing access grants/tokens to the client after successfully authenticating the resource owner and obtaining authorization.
  • Access Token : Access tokens are credentials presented by the client to the resource server to access protected resources. It’s normally a string consisting of a specific scope, lifetime and other access attributes and it may self contain the authorization information in a verifiable manner.
  • Refresh Token : Although not mandated by the spec, access tokens ideally have an expiration time which can last anywhere from a few minutes to several hours. Once an access token is expired, the client can request the authorization server to issue a new access token using the refresh token issued by the authorization server.

OAuth 2.0 in Depth

Before initiating the protocol, the client must register with the authorization server by providing its client type, its redirection URL (where it wants the authorization server to redirect to after the resource owner grants or rejects the access) and any other information required by the server and in turn, is given a client identifier and client secret (client_secret). This process is known as Client Registration.

The Web Server Flow

Since this is a redirection-based flow, the client must be able to interact with the resource owner’s user agent (which in most cases is a web browser) and hence is typically suited for a web application. The below diagram is a bird’s eye view of how the end-user (or the resource owner) uses the client application (web-server based application in this case) to authenticate and authorize with the authorization server, in order to access the resources protected by the resource server.

Authenticate & Authorize the Client

https://developers.google.com/oauthplayground/

Setup a Octopress Blog With Github

Follow the Gudie:

Troubleshooting


Here are some problem i face during the installation and setup process,hope it helps you:

Error 1

You have already activated rake 10.1.1, but your Gemfile requires rake 0.9.2.2. Using bundle exec may solve this.

solution :

modify the “Gemfile”, changed to gem ‘rake’, ‘~> 10.1.1’

Error 2

Fail to deply when run “rake deploy”

solution :

when Octopress runs commond rake depoly, it will push two brance to Github, one call “source”, it’s all your octopress code, another call “master”, it’s the gernerated html file to display your website. need to make sure all your brance up to date before you run “rake deploy”.

Extra Reading